Install on Windows
Guided Installation
The installation for Windows is provided through an .msi package. It has been tested on Windows 10 and Windows 11.
To install ADOxx or an ADOxx based tool on Windows:
- (once) Get an ADOxx license key if you don't have one yet. It is available from the ADOxx homepage.
- Download the
.zippackage with the installation files for Windows from the ADOxx homepage. - Extract the downloaded
.zipfile to a location of your choice. - Start
install_on_windows.msifrom the extracted location. - Follow the instructions of the installer.
- Dependencies are installed as necessary during the guided installation.
- When the Microsoft Visual C++ Redistributable installer asks for a restart, then restart the computer and execute
install_on_windows.msiagain.
In case you face any issues during installation, please have a look at the corresponding Troubleshooting section.
Guided Uninstallation
To uninstall ADOxx or an ADOxx based tool on Windows:
- Use the Windows Settings to uninstall / remove the tool.
The guided uninstallation does not remove the database file, which contains the configuration, libraries and models. By default the database file is located in the %APPDATA%/ADOxx/sqlitedbs/ folder and uses the database name as the file name, for example adoxx18.sqlite3.
Dependencies
ADOxx and ADOxx based tools require the Visual C++ Redistributables to be available:
Additionally the tool requires a database to store the data:
- Currently the default database system used is SQLite.
- Alternatively Microsoft SQL Server can be used. See Using Microsoft SQL Server as DBMS for details.
Manual Installation
The following describes the steps necessary to manually install and set up the ADOxx platform on Windows. It can be roughly described by the following steps:
- Install necessary 3rd party redistributable libraries.
- Install the database management system.
- Copy the ADOxx application files.
- Set up the ADOxx database.
- Create shortcuts for the Development Toolkit and the Modelling Toolkit.
Adapt the commands in the following sections as necessary for your system and the used ADOxx tool version.
Install Redistributable Libraries
Previously older Visual C++ redistributable were also needed, but should no longer be necessary. In case you encounter any errors about missing DLL files like MSVCR120.dll, MSVCP120.dll, VCOMP140.dll or similar, try installing the following redistributable packages:
- For missing
...120.dll: Microsoft Visual C++ 2013 Redistributable (x64) - For missing
...140.dll: Microsoft Visual C++ 2015 Redistributable (x64)
Install Database Management System
The current version of ADOxx uses SQLite for managing a simple database file by default. No special installation is needed for this case, as the necessary files are provided with ADOxx.
If necessary, it is also possible to use a Microsoft SQL Server to manage the database. The necessary details are described in the Using Microsoft SQL Server as DBMS section.
Copy ADOxx Application Files
- Copy the contents of the folder with the built ADOxx files to a folder on your hard drive, for example
C:\Program Files\BOC\ADOxx_1.8.0\.
Set Up Database
- Run the
asetlic.exetool from the ADOxx installation directory with the arguments"-plicense.ini" "-Lalicdat.ini"and specify the customer number and license number. - Run the
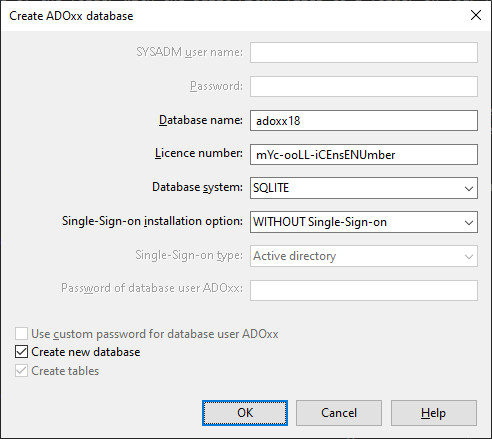
adbinst.exetool from the ADOxx installation directory. - In the dialog specify:
- the "Database name", which should be between 3 and 8 characters long and should only use ASCII letters and numbers,
- the "License number",
- select "SQLITE" as the "Database system",
- select "WITHOUT Single-Sign-on" for "Single-Sign-on installation option",
- mark "Create new database"

- Select "OK".
By default the database files are located in the folder %APPDATA%\ADOxx\sqlitedbs\. The environment variable ADO_SQLITE_DBFOLDER can be used to specify a path to a different folder where the database files should be stored instead.
Some ADOxx based tools come with example models / Attribute Profiles. These are located in the adostd.adl file inside the application's folder. After finishing the installation import them through the Modelling Toolkit by switching to the Import/Export component and selecting the menu Model -> ADL Import -> Models/Attribute profiles...
Create Shortcuts
It is recommended to create shortcuts for the Development Toolkit (aadma.exe) and Modelling Toolkit (areena.exe) at a location of your choosing, for example Desktop, Start Menu etc. These shortcuts can also use various arguments to pre-fill some of the login information and directly start the tool.
For example C:\Program Files\BOC\ADOxx_1_8_0\aadma.exe -u[user] -p[password] -d[database] -s[db-system], will directly start the Development Toolkit with the [user] and [password] logged into the [database] using the [db-system] (SQLITE or SQLSERVER). It is also possible to only use some of these arguments, like leaving out the -u[user] and -p[password].