ADL Import
The ADL import function allows the integration of data (models, attribute profiles, application models, ...) in one ADOxx database. The data to be imported must be saved using the ADL Export function prior to import.
ADL import is possible not only for Models/Model groups and attribute profiles/attribute profile groups but also for application models.
ADL Import - Model/Attribute profile Import
This function allows for the import of models, model groups, attribute profile and attribute profile groups. This process contains more steps:
- Start import
- Establish import settings and options
- Establish the aims of import and things to be imported
- Import
Start ADL Import of models/attribute profiles:
It is possible to start import in three ways:
- Click shortly on the smart-icon
 ,
, - Click and hold on the smart-icon and choose item from the drop-down menu "Models/attribute profiles",
- Choose "Models" from a menu item "ADL Import" sub menu item "Models/Attribute profiles".
The Window "Model Management - ADL Import" showing all ADOxx application libraries saved in database will be displayed:
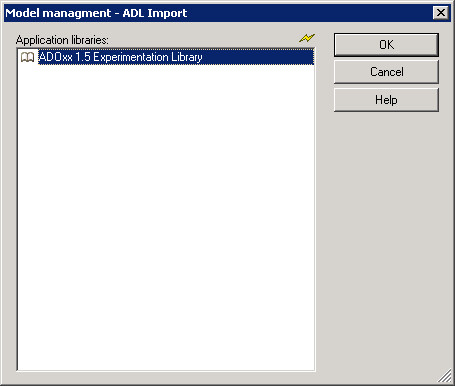
Choose the application library which contains the models or attribute profiles to be exported and then click on the "OK" button. The chosen library will be shown in the "ADL Import - Settings" window:
This dialogue consists of four parts, which can be identified with tabs.
ADL Import - Settings
In the window "ADL Import - Settings" you can define settings concerning import in the tabs "File selection", "Model options", "Attribute profiles" and "Log file".
Hint
The tab "Versioning" is only available after an appropriate definition in the application library (Customising) .
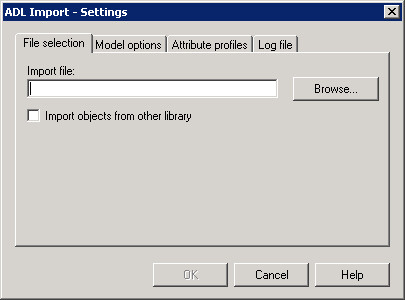
Tab "File selection":
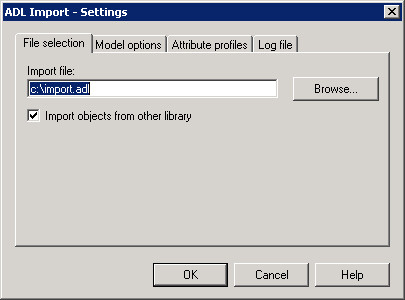
Enter the path and name of the ADL file with the model you wish to import into the "File selection" tab. The button "Browse..." opens a window for the user to searching for the location of the file to be imported.
The option "Import object from different library" is available to import models which are based on a different application library than the one that is currently selected.
Attention
The import of objects from different libraries will be successful only if most of the classes and relations are the same in both libraries. This is because only the classes and relations which exist in the library assigned to the user (current library) are imported. Similarly, only attributes which appear in the user library (current library) will be imported. Attributes that are in the current library and are missing in the objects of models to be imported will be added and filled in with default values of the current library. Attributes which exist in objects of the models to be imported and are not available in the current library will not be imported.
Hint
If you do not choose this option, it will not be possible to import external models. An information window will appear and import will be cancelled. If you are unsure in which application library your models are based, choose this option to successfully import the models.
Tab "Model options":
Here you can find settings for the import of models or model groups:
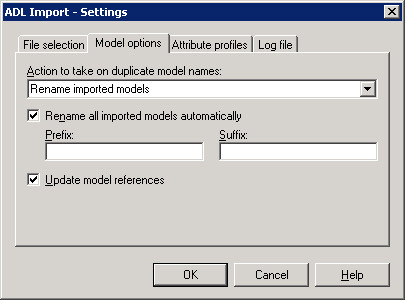
To import models, which have the same name as the models stored in the ADOxx database, you can select one of the following options from the list "Action to take on duplicate model names":
- "Rename models of file"
- "Paste into existing models"
- "Overwrite existing models"
- "Ignore models of file"
- "Increase version number"
The option "Rename all imported models automatically" assigns a prefix to the name of all imported models and/or a suffix. In a case where a name generated already exists in the database it will be processed according to the configuration of the option "Strategy on same model name".
Hint
If you have chosen "Rename models of file" or the option "Rename all imported models automatically" and assigned a prefix/suffix, then it is recommended to also select the option "Update model references".
The option "Update model references" is available for all options and should always be selected, when the imported models are renamed. By updating the model references the references to imported models are automatically updated in case one of the imported models is being renamed.
Hint
The strategy "Increase version number" as well as the additional action "Include version number in the model names" are available only for ADL Import to an application library with time-related versioning.
"Attribute profiles" tab:
In the "Attribute profiles" tab you can select one of the options for the import of attribute profiles:
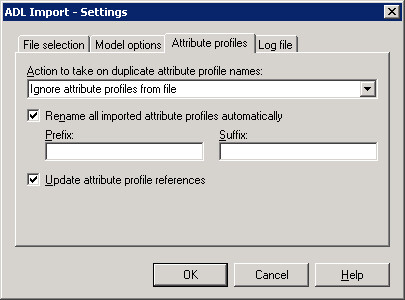
To import attribute profiles which have the same name as the models stored in the ADOxx database, you can select one of the following options from the list "Strategy on same attribute profile":
- "Rename attribute profiles from ADL file"
- "Paste into existing attribute profiles"
- "Overwrite existing attribute profiles"
- "Ignore attribute profiles from ADL file"
- "Increase version number"
The option "Rename all imported attribute profiles automatically" allows assigning a prefix to the name of all imported attribute profiles (it will be put in front of the attribute profile name) and/or a suffix (it will be put behind the attribute profile name). In the case that a name generated already exists in the database it will be processed according to the configuration of the option "Strategy on same attribute profile name".
Hint
If you have chosen as a strategy "Rename attribute profile from the file" or the option "Rename all imported attribute profiles automatically" and assigned a prefix/suffix, then it is recommended to select the option "Update attribute profile references" as well.
The option "Update attribute profile references" is available for all attribute profile options and should always be selected when the imported attribute profiles are renamed. By updating the attribute profile references, the references to imported attribute profiles are automatically updated in case one of the imported attribute profile is being renamed.
Tab "Log file":
It will enable you to generate a log for the ADL Import:
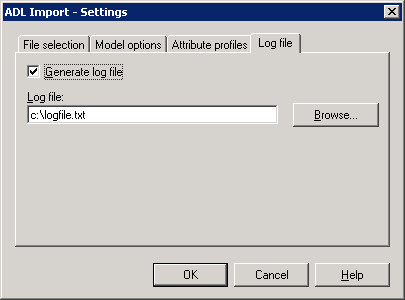
Activate the option "Generate log file" and enter into the "Log file" field the path and the name for the import protocol (TXT file). The button "Browse" opens a window for the user to locate a file to be chosen.
After selecting all the options, click on**"OK"**,to start ADL Import of models or attribute profiles to start ADL Import of models or attribute profiles.
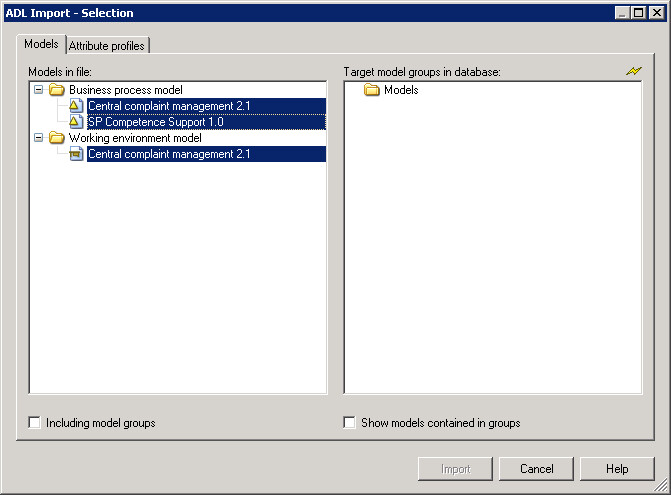
ADL Import of Models/Attribute profiles - Selection
After selecting an ADL file and determining the required settings the imported data is read; All the contained models and/or attribute profiles will be shown in the "ADL Import - selection" window.
Hint
The display of tabs "Models" and "Attribute profiles" depends on the input of the ADL file, i.e. only models in tab "Models", or only attribute profiles in tab "Attribute profiles" can be shown, exclusively one of two tabs can be available.
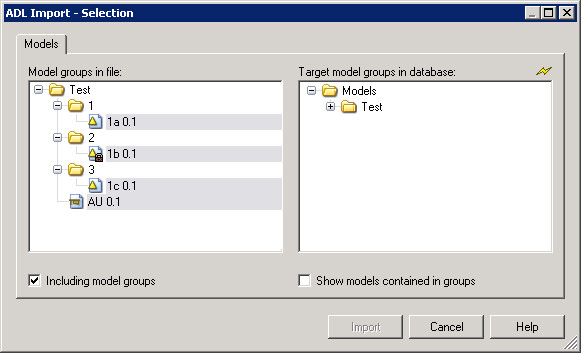
Tab "Models":
Models contained in an ADL file will be shown here:
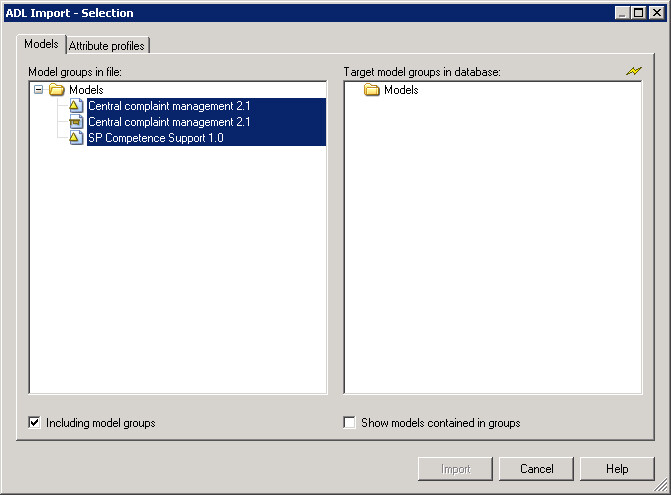
If the option "Including model groups" is activated in the "Models" tab, the models contained in the ADL file will be displayed according to their model hierarchy. When this option is selected the model group hierarchy will be imported as well as the selected models.
Hint
If no models are selected to be imported, only the model group hierarchy will be imported.
If you deactivate the option "Including model groups", the models contained in the ADL files are displayed according to their model type. Only the selected models will be imported while using ADL Import:
Select the option "Show models contained in groups" to see lists of models contained in all model groups.
To choose imported models: Select all the models you want to import along with the model groups which you want to create references to the imported models.
Models with limited access:
ADL files can contain models with a limited access ("read-only" instead of "write". Such models are shown in the preview with a lock symbol:
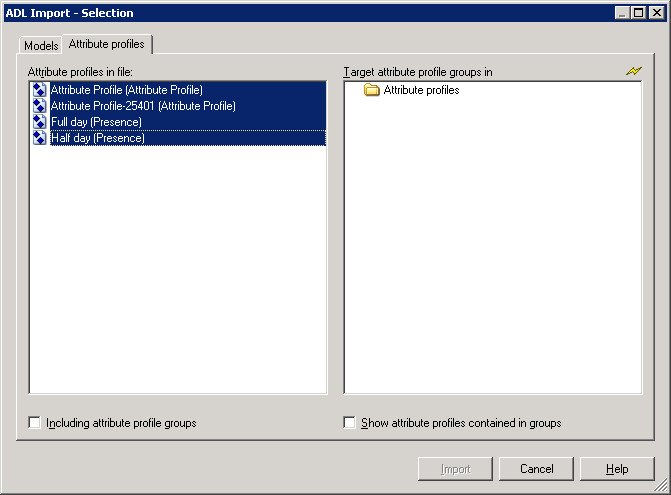
Tab "Attribute profiles":
All the attribute profiles contained in the ADL file will be displayed here:
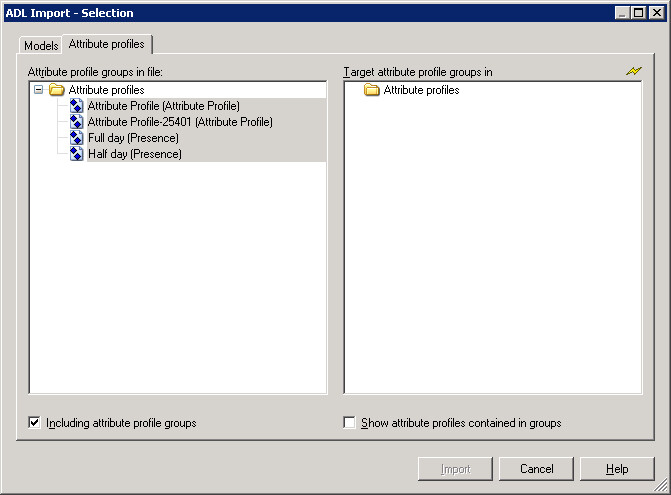
If you activate the option "Including attribute profile groups", the attribute profiles contained in the ADL file will be displayed according to their hierarchy. When this option is selected the attribute profile group hierarchy will be imported as well as the selected attribute profiles.
Hint
If no attribute profiles are selected to be imported, only the attribute profile group hierarchy will be imported.
If you deactivate the option "Including attribute profile groups" in the tab "Attribute profiles", the attribute profiles contained in the ADL file will be displayed with no structure. Only the attribute profiles selected will be imported during the ADL Import:
When you select the option "Show attribute profiles contained in groups" the attribute profiles contained in the ADOxx Database will be displayed.
To choose import profiles: Select all the attribute profiles you want to import and the attribute profile groups in which you want to create a reference to the imported profile.
To import:
After choosing model and attribute profiles click on "Import", to start the ADL Import.
Hint
If you don't select any destination model group, the main model group in the ADL file (the uppermost hierarchy level) will be included in the main model group in the ADOxx database.
During the import excluding model groups, the selected models will not be assigned to a model group and so no ADOxx user will be entitled to open them. Before the import, a security message will inform you about this.
Hint
If you import an ADL file with its attribute profile groups and you don't select any destination attribute profile group, the main attribute profile group in the ADOxx database (the uppermost hierarchy level) will be used as a destination group.
During the import excluding attribute profile groups, the import of selected attribute profiles is not possible, if previously no destination attribute profile group has been selected.
At the beginning of the import, the ADOxx database is first checked for models or attributes which have the same name as the models or attributes to be imported.
Hint
Only the name of the models or of the attribute profiles to be imported is compared to the models or attribute profiles stored in the ADOxx database,not their contents. Therefore, an imported model or attribute profile may have the same content as one stored in the ADOxx database, but under a different name. This means it is very important to select the appropriate options as listed in the window "ADL Import - Settings" for importing models with identical names or in the window "ADL Import - Settingsfor importing attribute profiles with identical names.
A status window keeps you informed about the current status of the import.
Hint
During the import, if the ADL file contains a model of a type which is not defined in the current application library and the option "Import models from different library" is activated in the window "ADL Import - Settings", it is possible to assign a model type defined in the application library to this model .
ADL Import - Assign model type
If a model's type as specified in the ADL file being imported does not exist in the current application library, the window "ADL Import - Assign model type" is displayed, in which you assign a model type to the model:
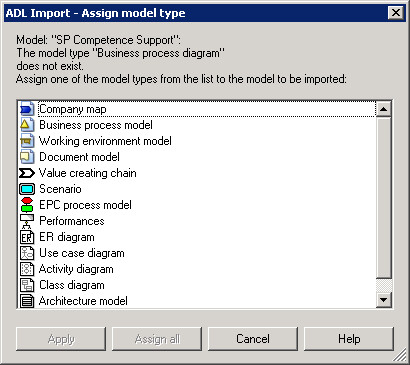
A list of all model types defined in the current application library will be displayed. Select one model type and assign it to the model being imported by clicking on the "Apply" button. If you click on the "Assign all" button, the selected model type will be assigned to all models contained in the ADL file with the same model type. If you click on the "Skip" button, the model will not be imported. If you click on the "Skip all" button, all models with the same model type will be skipped. The ADL Import will continue.
ADL Import (models/attribute profiles) - Result
After the successful completion of the ADL Import procedure, a window "ADL Import - Results" shows a summary of the import. The list provided contains the names of the models that were just imported and that are now stored in the ADOxx database (sorted by model type):
If in the window "ADL- Import - Settings" - Tab "Protocol" the option "Generate protocol" is active and a path and the name for the protocol file to be created is provided, then the button "Protocol" will be shown in the "ADL Import - Results" window. By clicking on this button the generated protocol will be shown in a text editor.
Hint
If you have imported model groups exclusively, the successful ADL Import will be indicated through an appropriate message window.
Import application models
This function allows the user to import application models. This process contains the following steps:
- Start import
- Establish import settings and options
- Establish the aims of import and items to be imported
- Import
To start ADL Import of application models:
It is possible to import in two ways:
- Click and hold on the smart-icon and choose from the drop-down menu. You can see the menu item "Application models",
- Choose from the menu "Models" menu item "ADL Import" and then its sub menu item "Application models".
The window "File selection - ADL Import" where all ADOxx application libraries saved in the database are shown:
Choose the application library ,which contains the models or attribute profile to be exported and click on "OK" button. The chosen library will be shown in the "ADL Import - Settings" window :
This dialogue consists of three parts, which can be identified with tabs.
ADL Import - Settings
In the window "ADL import - Settings" you can define the settings concerning the import in the tabs "File selection", "Model options", and "Log file".
Tab "File selection":
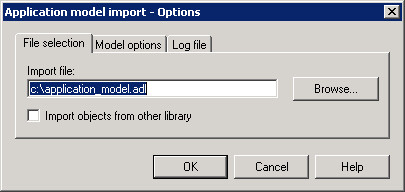
Enter the path and the name of the ADL file with the model you wish to import into the "File selection" tab. The button "Browse" opens a window allowing the user to search for the file to be chosen.
The option "Import object from different library" is available to import models which are based on a different application library than the previously selected.
Tab "Model options":
Here you define settings for import of application models:
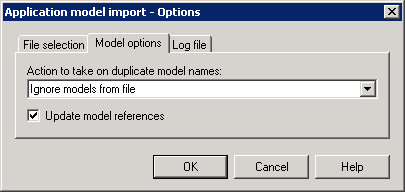
In a case where application models in the file to be imported have the same names as the models stored in the ADOxx database, you can always use the option "Ignore models from file" as the**"Strategy on same model name"**.
Hint
When importing application models, which come from an application library with time-related versioning, you can choose the option "Increase version number" as reaction when the names of the models are the same. As a result, when you get an application model of the same model type and with the same model name, the next version number will be assigned to it during import automatically.
Activate the option "Update model references" to correspondingly update the references within the imported models during the change of the name of the imported models. Thanks to this option all the references to the imported models will be automatically updated.
Hint
The option "Update model references" only has an affect when importing application models to an application library with a time-related version where you have selected the option "Increase version number" as a response.
Tab "Log file":
In this tab you can have a protocol generated for the ADL Import.
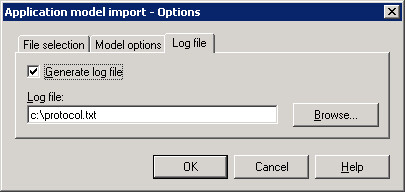
For this, activate the option "Generate log file" and enter the path and the name for the import log file (TXT file) into the "Protocol path file". The Button "Browse" allows the user to search for the ADL file.
Once you have successfully entered the settings, click on the "OK" button to assign them.
ADL Import of application models - Model overview
The content of the ADL file to be imported is read and the application models contained in the file are listed in the window "Application Model Import - Model overview":
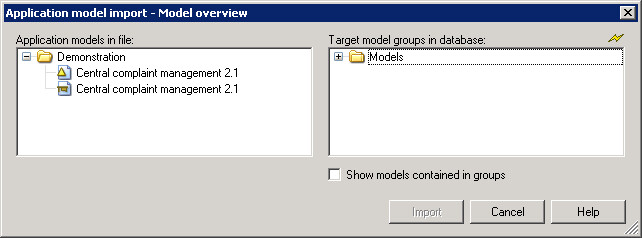
Select the model group into which a reference to the models defined in the application models imported should be generated.
Hint
If you don't select a destination model group, the imported models will not be assigned to a model group and so can not be opened by an ADOxx user. Before the import, a security query will inform you about this.
Click on the button "Import" to import the models.
A status window will inform you on the progress of the ADL import.
Hint
If the ADL file contains a model of a type which is not defined in the current application library, you can assign a model type defined in the application library to this model during the import.
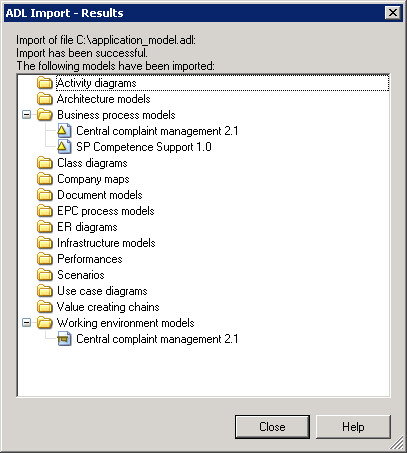
ADL Import of application models - Result
After the ADL Import has been successfully completed, the window**"ADL Import - Results"** will inform you about the conclusion of the import. This window lists the names under which the import models are stored in the ADOxx database.
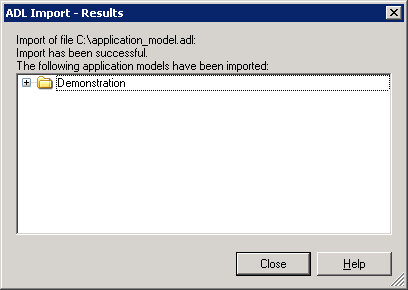
If you activate the option "Generate log file" in the window "ADL Import - Options" - "Protocol" tab and give the path and the name for the log file to be created, then the button "Log file" will be shown in the "ADL Import - Results". By clicking on this button the generated log file will be shown in a text editor.